模板引擎

数据交互

模板引擎采用Handlebars,github地址:* Handlebars.js 1.内部模板:采用script标签作为模板标签,script类型为type="text/x-handlebars-template"。使用Handlebars.compile(t("#template").html())(data)进行渲染。 2.外部模板:调用外部的html文件,t(".current ul").renderAppend("template_render.html", data2);采用renderAppend直接渲染,第二个参数为数据。

示例:

 
<script id="template" type="text/x-handlebars-template">
	{{#boys}}
	<li>
		<a href="javascript:;" class="link_item">
			<div class="item item-trim">
				<div class="item_left">
					<div class="item-icon-l-b bg_blue">
						<i class="icon ion-android-apps"></i>
					</div>
				</div>
				<div class="item_center">
					<div class="item-content">{{name}}</div>
				</div>
			</div>
		</a>
	</li>
	{{/boys}}
</script>
<script>
	var data = {boys: [{name: "内部模板渲染"},{name: "内部模板渲染"},{name: "内部模板渲染"},{name: "内部模板渲染"},{name: "内部模板渲染"}]};
    var data2 = {boys: [{name: "外部模板渲染"},{name: "外部模板渲染"},{name: "外部模板渲染"},{name: "外部模板渲染"},{name: "外部模板渲染"}]};
	function update(){
		t(".current ul").append(Handlebars.compile(t("#template").html())(data));
	}
    function update2(){
        t(".current ul").renderAppend("template_render.html", data2);
    }
</script>

3.模板引擎插件helper,为Handlebars做逻辑扩充。github地址:* Handlebars-Helpers 具体方法:

 
<script>
 	{{#is x}} ... {{else}} ... {{/is}}
 	{{#is x "not" y}} ... {{else}} ... {{/is}}
	{{#is 5 ">=" 2}} ... {{else}} ... {{/is}}
	// Loose equality checking
	{{#is x y}} ... {{else}} ... {{/is}}
	{{#is x "==" y}} ... {{else}} ... {{/is}}
	
	{{#is x "!=" y}} ... {{else}} ... {{/is}}
	{{#is x "not" y}} ... {{else}} ... {{/is}}
	
	// Strict equality checking
	{{#is x "===" y}} ... {{else}} ... {{/is}}
	{{#is x "!==" y}} ... {{else}} ... {{/is}}
	
	// Greater/Less Than
	{{#is x ">" y}} ... {{else}} ... {{/is}}
	{{#is x ">=" y}} ... {{else}} ... {{/is}}
	
	{{#is x "<" y}} ... {{else}} ... {{/is}}
	{{#is x "<=" y}} ... {{else}} ... {{/is}}
	
	// In comma separated list, or array
	{{#is x "in" "foo,bar"}} ... {{else}} ... {{/is}}
	{{#is x "in" anArray}} ... {{else}} ... {{/is}}
</script>

4.建议使用方式: (1)项目根目录:template.html 保存所有模板文件。 (2)js目录下:script.js 放置所有服务器请求,同时进行渲染。 也可以根据对象创建目录,分开保存到相应目录中。

配置

配置

系统设置,可以通过t.setting(params)进行配置。例如

    t.setting({autoload: false});

配置参数:

参数名称 类型 默认 描述
root string index.html 首页地址,用于自动返回功能时,最后返回地址。
cache boolean true 预留字段
autoload boolean false 自动预加载开关,如开启此功能,会预先加载下一页的内容,默认为true开启自动加载功能。`此功能已经弃用`
async boolean false 异步加载开关,如开启此功能,会异步加载调用或加载内容,默认为false关闭。
env boolean true 是否开启调试环境
preload boolean true 页面间过度动画开关,如开启此功能,当访问新页面或返回原页面的时候,如果有网络延迟,会出现等待动画,默认开启。
animation boolean false 页面动画效果开关,安卓手机一般为关闭false,ios为true。以前的安卓手机会有卡顿现象,根据具体情况选择开关。
rightTouch boolean false 右滑动返回上一页开关,注意如开启此功能,要保证页面中没有相关右滑动的ui,否则会有冲突,默认关闭。

Hbuilder中配置动画开关实例

	document.addEventListener("plusready", function() {
	    //判断如果是ios系统,开启页面滑动动画。
		if(plus.os.name.toLocaleLowerCase() == "ios"){
			t.setting({preload: true, animation: true});
		}
	});

风格配置: 风格参数:

参数名称 类型 默认 描述
navbgColor string #2196f3 顶部背景颜色
radioActiveColor string #333 单选背景颜色
checkboxActiveColor string #333 多选背景颜色
tabActiveColor string #2196f3 顶部和底部导航背景颜色

风格初始化:

    t.styles = {
        navbgColor: "#2196f3",
        radioActiveColor: "#333",
        checkboxActiveColor: "#333",
        tabActiveColor: "#2196f3"
    }

提示框

提示

提示框:t.alert(content, fn, style),content提示内容,fn为alert点击后触发事件。style为空的时候是错误提示,当style为success的时候为正确提示。

    <a href="javascript:;" class="btn bg_teal alert">alert</a>
    <script>
        t(".alert").click(function () {
            t.alert("you want use?", function(){
                t.toNextPage("list.html");
            });
            return false;
        });
    </script>

信息提示框:t.confirm(content, function),content信息内容,function点击按钮的事件,其中obj.action为按钮的名称,用来判断用户点击了哪个按钮。

    <a href="" class="btn bg_teal confirm">confirm</a>
    <script>
        t(".confirm").click(function () {
            t.confirm("you want use?", function(obj){
                t.alert("btn name", obj.action);
            });
            return false;
        });
    </script>

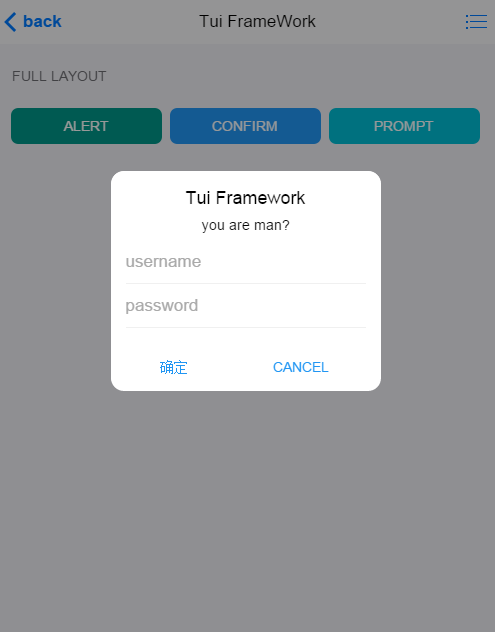
自定义提示框方法:t.popup(popup_id, function(obj){})
参数1:要弹出的div的id。
参数2:处理弹出后点击按钮的事件,其中obj.action为按钮的名称,用来判断用户点击了哪个按钮。

    <a href="" class="btn bg_teal prompt">prompt</a>
	<div id="popup3" class="popup-by-input">
		<div class="popup-msg">
			<div class="popup-title-hr">
				<a href="javascript:;"><i class="ion-close"></i></a>
				<span style="margin-left: 10px;">
					请输入账号密码
				</span>
			</div>
			<div class="popup-content">
				<div class="input-field">
					<input type="text" placeholder="username">
				</div>
				<div class="input-field">
					<input type="password" placeholder="password">
				</div>
			</div>
		</div>
		<div class="popup-btn">
			<a href="javascript:;" class="btn btn-sm bg_blue">确定</a>
		</div>
	</div>
    <script>
        t(".prompt").click(function () {
            t("#popup3").popup(function (obj) {
                if (obj.action == "确定") {
    				return true; //返回真,关闭提示框。

                } else if (obj.action == "") {
    				return false; //返回假,不关闭提示框。

                }
            });
        });
    </script>